There’s nothing quite like the satisfaction of a perfectly running air tool, but let’s be honest, the sheer frustration when it sputters or stops altogether is just as intense.
I’ve been there countless times, mid-project, my trusty impact wrench suddenly refusing to budge a stubborn bolt, bringing everything to a screeching halt.
In today’s incredibly fast-paced world, where efficiency is king and project deadlines loom large, having reliably functional equipment isn’t just a convenience – it’s a fundamental necessity.
From a subtle air leak that drains your compressor’s power to a complete loss of function, these unexpected hiccups can derail your progress, costing you not only precious time but also hard-earned money.
With the constant push for smarter workshops and more sustainable practices, understanding how to troubleshoot and maintain your pneumatic workhorses is more critical than ever.
It’s about empowering yourself to fix, not just replace, and ensuring your investments last. Let’s find out exactly how to get them back in top shape.
The Subtle Saboteur: Tracking Down Air Leaks

There’s almost nothing more frustrating than hearing that faint, almost imperceptible hiss of air escaping when your compressor is running but your tool isn’t even in use.
It’s like having a slow leak in your car tire – you know it’s there, but finding it can feel like a Herculean task. I remember once spending an entire afternoon trying to figure out why my compressor was constantly cycling, only to discover a pinhole leak in a section of hose I thought was perfectly fine.
This silent drain on your system doesn’t just waste energy, it significantly reduces the effective pressure reaching your tools, turning what should be a powerful impact wrench into a glorified paperweight.
Low air pressure often manifests as tools performing sluggishly, lacking the expected torque or speed, or just failing to activate properly. It’s the kind of issue that makes you question your tools, but more often than not, the problem lies upstream.
1. The Soapy Water Method: Your Best Friend for Leak Detection
This is an old trick, but it’s gold. Mix up a solution of dish soap and water – something like 1 part soap to 3 parts water is usually perfect – in a spray bottle.
With your compressor running and the air lines pressurized, liberally spray every connection point, every inch of your hoses, and even the tool’s air inlet.
Keep a keen eye out for bubbles. Any sustained bubbling indicates an air leak, even the tini smallest ones. From experience, don’t just spray and glance; take your time.
Sometimes the bubbles take a few seconds to form, especially on slower leaks. I’ve found leaks around quick-connect fittings that I swore were tight, simply because the O-rings were a little worn.
2. Inspecting Hoses and Fittings for Wear and Tear
After you’ve checked your connections, shift your focus to the hoses themselves. Air hoses, especially in a busy shop environment, take a beating. They get dragged, stepped on, run over, and exposed to oils and chemicals.
Look for cracks, abrasions, or soft spots. Even a small nick can become a major leak under pressure. Pay close attention to where the hose connects to the fittings; this is a common point of failure due to bending and stress.
Replacing a worn hose might seem like an expense, but it’s far cheaper than the energy wasted by a constant leak, not to mention the lost productivity from underperforming tools.
Remember, prevention is often less painful than a cure in the long run.
When Power Falters: Diagnosing Low Performance
There’s nothing quite like the feeling of grabbing your air tool, ready to tackle a job, only to have it whir weakly or, worse, just sit there doing nothing.
It’s a definite “pull your hair out” moment. I’ve been there, thinking my trusty air sander was on its last legs, only to discover the problem was much simpler and entirely fixable.
Low performance can be frustratingly vague, manifesting as reduced torque, slower speeds, or inconsistent operation. It’s not just an inconvenience; it can truly bottleneck your workflow, especially on time-sensitive projects.
Before you toss your tool and shell out for a new one, let’s dive into some common culprits that frequently cause this kind of headache and how you can bring your tools back up to peak performance.
1. Pressure Drop: The Hidden Cause of Weakness
First and foremost, check the air pressure *at the tool*. Your compressor might be set to 90 PSI, but if you’re running a long, narrow hose or have several quick-connects in series, you might only be getting 60 PSI by the time it reaches your tool.
I learned this the hard way when my impact wrench just wouldn’t loosen bolts, even though my compressor pressure seemed fine. The key is to ensure adequate flow (CFM) as well as pressure (PSI).
Many tools have minimum CFM requirements, and if your compressor or lines can’t deliver, your tool will simply underperform. Using larger diameter hoses for longer runs and minimizing quick-connects can make a significant difference.
2. Restricted Airflow: The Internal Blockage
Just like a clogged artery, restricted airflow within the tool itself can severely hamper its operation. This is often due to debris, rust, or old, congealed oil building up in the internal air passages.
This often happens gradually, so you might not notice until your tool is barely functioning. It’s a common issue, especially if your air line isn’t properly filtered or if you’ve neglected regular lubrication.
Cleaning out these internal pathways can often restore full power. I’ve personally resurrected several ‘dead’ air tools simply by giving them a thorough internal cleaning and then ensuring I was using an air line filter.
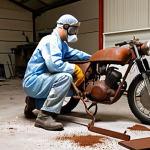
The Sticking Point: Freeing Up Seized Mechanisms
Imagine picking up your air ratchet, ready to get into a tight spot, only for the trigger to be stiff, or the motor to feel completely locked up. It’s a true facepalm moment that tells you your tool has seen better days, or more accurately, better care.
I’ve encountered this more times than I care to admit, especially with older tools that haven’t been used regularly or stored in less-than-ideal conditions.
A seized mechanism can stem from several issues, from dried-out lubrication to actual corrosion, and it brings your productivity to a screeching halt.
The good news is, often, these tools aren’t dead, just stubbornly stuck, and with a little patience and the right approach, you can usually bring them back to life.
1. The Power of Penetrating Oil and Patience
When a tool feels completely seized, don’t force it. Your first line of defense should be a good penetrating oil. This isn’t your regular air tool oil; penetrating oil is designed to seep into tight spaces, break down rust, and dissolve old, gummy lubricants.
I usually apply it generously to any moving parts – the trigger mechanism, the motor housing (if accessible), and any visible joints. Then, and this is crucial, let it sit.
Sometimes for an hour, sometimes overnight. I’ve found that patience here pays dividends. After letting it soak, gently try to work the mechanism.
A little tap with a rubber mallet can sometimes help, but avoid excessive force that could bend or break internal components.
2. Disassembly and Deep Cleaning for Stubborn Cases
If penetrating oil doesn’t do the trick, it’s time to get a bit more involved. Carefully disassemble the tool – and I mean *carefully*. Take pictures as you go, because remembering how all those tiny springs and pins go back together can be a nightmare.
Once disassembled, you can access the internal components for a thorough cleaning. Use a parts cleaner or a degreaser to remove all traces of old grease, dirt, and rust.
Small brushes, cotton swabs, and even compressed air can be invaluable here. I once had an old air hammer that was completely stuck; disassembling it revealed layers of dried, grimy oil that literally glued the piston in place.
A good cleaning and re-lubrication brought it back to life, almost as good as new.
Oil is Gold: The Crucial Role of Lubrication
It might sound basic, but the lack of proper lubrication is, in my experience, the number one killer of air tools. It’s a simple step, often overlooked, that can mean the difference between a tool that lasts for decades and one that quits after a few months.
I’ve seen countless tools come through my shop – impact wrenches, grinders, even paint sprayers – all suffering from the same self-inflicted wound: oil starvation.
Air tools operate at incredibly high speeds, and their internal components, usually made of precision-machined metal, rely heavily on a thin film of oil to prevent friction, heat buildup, and premature wear.
Ignoring lubrication is like running your car without oil; it’s a guaranteed path to failure.
1. The Right Oil, The Right Amount, The Right Frequency
This isn’t a case where any old oil will do. You *must* use dedicated air tool oil. It’s specially formulated to be non-detergent, prevent rust, and atomize properly with compressed air.
I’ve personally seen folks use motor oil or even WD-40, and while they might seem to work for a moment, they often cause more problems down the line by gumming up mechanisms or not providing adequate lubrication.
For tools used daily, a few drops (around 5-10, depending on the tool size) into the air inlet before and after each use is a good rule of thumb. For intermittent use, always oil before starting a project.
Consistency is key here.
2. Why Your Oiling Routine is as Important as the Oil Itself
Just having the right oil isn’t enough; you need a routine. I keep a small bottle of air tool oil right next to my air hose, a visual reminder that helps me remember to lubricate before connecting any tool.
After adding the drops, run the tool for a few seconds to distribute the oil internally. This ensures all the moving parts get their much-needed lubrication.
Sometimes, if a tool has been sitting for a while, I’ll add a few extra drops and let it run for 30 seconds or so, just to ensure everything is freed up and well-coated.
This simple habit genuinely extends the life of your expensive air tools and keeps them running smoothly and powerfully for years.
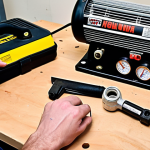
Beyond the Hose: Compressor and Air Line Health
We often focus so much on the air tool itself, we forget the lifeline that feeds it: the compressor and the air delivery system. It’s like having a high-performance sports car but trying to fuel it with a garden hose – it just won’t work optimally.
I’ve seen workshops where magnificent, powerful compressors are choked by undersized hoses or neglected filters, leading to frustrating tool performance and constant breakdowns.
The air supply isn’t just about pressure; it’s about clean, dry air delivered consistently and efficiently. Ignoring this crucial part of your pneumatic setup is a recipe for disaster, affecting not just your tools but also your workshop’s overall efficiency.
1. The Unseen Enemy: Moisture and Contaminants
Compressed air contains moisture, especially in humid environments. This moisture, if not removed, will eventually condense inside your air lines and tools, leading to rust, corrosion, and lubrication breakdown.
I’ve had air tools literally seize up due to internal rust because I neglected my moisture trap. A good air compressor setup includes a moisture separator (often integrated into the regulator) and, ideally, an in-line air filter close to the point of use.
Regularly draining your compressor’s tank is paramount – I do it every time I finish using it, just a quick pull of the drain valve. That nasty, rusty water that comes out is proof of what you’re preventing from getting into your tools.
2. Optimizing Your Air Line Infrastructure
Your air lines are the arteries of your pneumatic system. Using too small a diameter hose can cause significant pressure drops, especially over long distances or with high-CFM tools.
I made this mistake early on, trying to run a heavy-duty impact wrench off a small coiled hose, and the performance was abysmal. Upgrade to larger diameter hoses (like 3/8-inch or 1/2-inch for main lines) for better flow.
Also, minimize quick-connect fittings where possible, as each connection can introduce a small pressure drop and a potential leak point. Think about a hard-piped system for fixed workstations; it reduces leaks and ensures consistent air delivery.
Regularly inspect all fittings and hose connections for tightness and wear.
Preventative Measures: Extending Your Tool’s Lifespan
It’s easy to get caught up in the daily grind, constantly using our air tools without a second thought until they inevitably sputter or fail. But as I’ve painfully learned over the years, a little bit of proactive care goes a very long way in preventing those frustrating breakdowns and extending the life of your valuable equipment.
Think of it like regular oil changes for your car – you wouldn’t skip those, would you? Your air tools deserve the same level of respect and routine maintenance.
Investing a small amount of time in prevention now will save you a huge amount of headache, repair costs, and downtime in the future. This isn’t just about keeping tools running; it’s about maximizing your investment.
1. The Ritual of Post-Use Care
What you do immediately after using your tool is almost as important as proper lubrication. Before disconnecting, I always add a few drops of air tool oil into the inlet and run the tool for a few seconds.
This helps distribute the oil and ensures the internal components are coated before storage, preventing rust and keeping everything pliable. Then, I disconnect the air line and store the tool in a clean, dry place.
Avoiding damp environments is crucial, as moisture is the enemy of metal. A dedicated toolbox or a pegboard in a climate-controlled area works wonders.
I’ve personally seen tools that were left exposed to the elements quickly develop rust and internal corrosion.
2. Scheduled Deep Cleans and Inspections
Beyond daily oiling, a periodic deep clean and inspection schedule is essential, especially for tools that see heavy use. Depending on how frequently you use them, this might be quarterly or bi-annually.
This involves a more thorough cleaning of the exterior, checking for loose fasteners, inspecting internal components if possible (like taking off the front plate of an impact wrench to check the anvil assembly), and looking for any signs of wear or damage.
This is also a good time to re-lubricate moving parts that aren’t reached by regular air tool oil, like gears or bearings, with appropriate grease. This kind of systematic approach helps you catch small problems before they escalate into major, costly repairs.
| Symptom | Likely Cause(s) | Troubleshooting Step(s) |
|---|---|---|
| Low Power/Sluggishness |
|
|
| Constant Air Leak/Hissing |
|
|
| Tool Seized/Won’t Turn |
|
|
| Excessive Noise/Vibration |
|
|
DIY Fix or Professional Help? Making the Right Call
There comes a point in every air tool owner’s journey where you have to decide if a repair is within your capabilities or if it’s time to call in the cavalry.
I’ve been there countless times, staring at a disassembled tool with a pile of tiny springs and bolts, wondering if I’ve just created a paperweight or if I can actually put it back together.
It’s a balance between saving money and saving your sanity (and your tool). While many common issues are surprisingly straightforward to fix with a little patience and the right guidance, some problems really do warrant professional attention.
Knowing when to stop and seek expert help can prevent you from doing more harm than good and ultimately save you money in the long run.
1. Assessing Your Skill Level and the Tool’s Complexity
Before you grab that screwdriver, honestly evaluate your own mechanical aptitude. Are you comfortable with intricate parts? Can you follow a diagram or a video tutorial?
For basic issues like a leaky quick-connect, a simple hose replacement, or a general lack of lubrication, most DIYers can handle it. However, if the problem involves deeply internal components of a complex impact wrench, an air hammer’s piston assembly, or specialized parts that require precise calibration, it might be beyond your comfort zone.
I learned early on that attempting to repair something I didn’t fully understand often led to more broken parts or an unfixable mess.
2. Cost-Benefit Analysis: Repair vs. Replace
This is the ultimate decision point. Start by getting an estimate for the parts needed for the repair. Then, if you’re considering professional help, get a quote for labor.
Compare this total cost to the price of a brand-new tool of similar quality. Sometimes, especially with entry-level or older tools, the cost of parts and labor can quickly exceed the cost of a replacement.
However, for high-end, professional-grade tools, repairs often make economic sense, especially if it’s a tool you rely on daily. Consider also the sentimental value or the “known quantity” of your existing tool versus the uncertainty of a new one.
I once spent a bit more to fix an old, reliable air ratchet because I knew its performance, and finding a new one with the same robust build quality would have cost significantly more.
Concluding Thoughts
I’ve shared my own experiences and what I’ve learned the hard way about keeping air tools in top shape. It truly boils down to consistent, thoughtful care.
Think of your air tools not just as equipment, but as trusted partners in your workshop; they deserve that little bit of attention. By investing a small amount of time into proper maintenance and quick troubleshooting, you’re not just extending their lifespan, you’re ensuring they’re always ready to perform, saving you time, money, and a whole lot of frustration.
Happy wrenching!
Useful Information
1. Always wear appropriate safety gear, including eye protection and hearing protection, when operating air tools. Their power and noise levels demand it.
2. Invest in quality air tool accessories, such as a reliable air filter/regulator/lubricator (FRL) unit. This “trio” significantly improves air quality and simplifies daily oiling.
3. Keep your tool manuals! They contain crucial information on maintenance schedules, specific oiling points, and disassembly instructions unique to your model.
4. Consider a dedicated storage solution for your tools, like a padded case or a well-organized drawer. This protects them from dust, moisture, and accidental drops.
5. Don’t be afraid to consult online forums or YouTube tutorials for specific tool models. There’s a wealth of community knowledge out there that can help with obscure issues.
Key Takeaways
Maintaining your air tools isn’t a chore; it’s an investment in their longevity and your productivity. Regular lubrication with the correct air tool oil is paramount. Vigilantly inspect for air leaks and ensure your air supply is clean and dry to prevent internal damage. Troubleshoot low performance by checking pressure at the tool and ensuring clear internal airflow. For seized tools, patience with penetrating oil or a careful deep clean can often revive them. Finally, understand when a DIY fix is appropriate versus when professional help is the smarter, more cost-effective choice. Proactive care truly keeps your tools performing at their peak, project after project.
Frequently Asked Questions (FAQ) 📖
Q: My air tools seem to give up the ghost at the worst possible moment. What are the most common culprits behind their sudden failure, and what should I be looking out for?
A: Oh, I feel that in my bones! There’s nothing more annoying than a tool that suddenly decides to play dead mid-job. From my years wrestling with everything from impact wrenches to air ratchets, I’ve seen a few recurring themes.
Often, it’s not some catastrophic internal failure right away. More frequently, it’s a subtle air leak – maybe a worn O-ring, a loose fitting, or a slightly damaged hose.
I remember once, I spent half a Saturday trying to figure out why my sander felt so weak, only to discover a tiny pinhole in the hose near the coupler that was whistling like a tea kettle if you listened closely.
That little leak was starving the tool of the pressure it needed. Another big one is moisture in the air line. If you’re not regularly draining your compressor tank and perhaps not running an inline air filter/dryer, that water gets into your tools, corrodes internal components, and gums up the moving parts.
It’s a slow killer, but a definite killer. And honestly, just plain old neglect – not lubricating properly, letting them sit in dusty corners – that’s a surefire way to invite trouble.
Think of it like your car; skip the oil changes, and you’re asking for trouble down the road.
Q: When my air tool starts sputtering or loses power, what’s the immediate, first thing I should check before diving into something more complicated? I just need to get back to work!
A: Believe me, I’ve been right there, heart pounding, project grinding to a halt, thinking, “Oh, for crying out loud, now?!” When an air tool acts up, my first instinct, before I even think about cracking it open, is always to check the absolute basics.
And I mean absolute basics. First, is your air compressor actually on and building pressure? Sounds obvious, but I’ve kicked myself more times than I care to admit for not checking the power switch or realizing a circuit breaker tripped.
Then, check your air line. Is it kinked? Is the quick-connect coupler fully seated?
I had a terrifying moment once where I thought my brand-new air chisel was dead on arrival, only to realize I hadn’t pushed the coupler in all the way.
A slight wiggle, and suddenly, it roared to life. Next, glance at your pressure regulator; is it set to the right PSI for the tool you’re using? Many tools need specific pressure to operate efficiently, and if you’ve been running something high-demand like a paint gun, you might have forgotten to dial it back down for your impact wrench.
These simple, often overlooked checks can save you an enormous amount of time and frustration, and usually, they’re the quickest path back to productivity.
Q: You mentioned “fix, not just replace.” With new tools constantly on sale, is it really worth the time and expense to repair an older pneumatic tool, or should I just bite the bullet and buy a new one?
A: That’s a question I’ve wrestled with many times myself, especially when I see a shiny new tool on a Black Friday sale. But my experience, especially with good quality pneumatic tools, has overwhelmingly taught me that it’s often, often, worth repairing.
Think about it: a decent impact wrench or an air hammer isn’t cheap – we’re talking a couple hundred bucks, maybe more, for a reputable brand. If the issue is something like a worn-out valve, a leaky O-ring kit, or a broken rotor vane, those repair kits often cost a fraction of a new tool, sometimes just twenty or thirty bucks.
I’ve brought back countless tools from the brink with a simple seal kit and an hour of my time. Plus, there’s an immense satisfaction in knowing you salvaged something, prevented it from hitting the landfill, and saved yourself some serious cash.
Sure, if a tool is utterly catastrophic – say, the housing is cracked clean through, or the motor is completely seized and beyond repair – then, yeah, maybe it’s time to shell out for a new one.
But for the vast majority of common issues, a repair isn’t just financially savvy; it’s a smart, sustainable move that keeps your hard-earned dollars in your pocket and contributes to a less wasteful workshop.
Don’t be afraid to give that old workhorse a second lease on life!
📚 References
Wikipedia Encyclopedia
구글 검색 결과
구글 검색 결과
구글 검색 결과
구글 검색 결과
구글 검색 결과